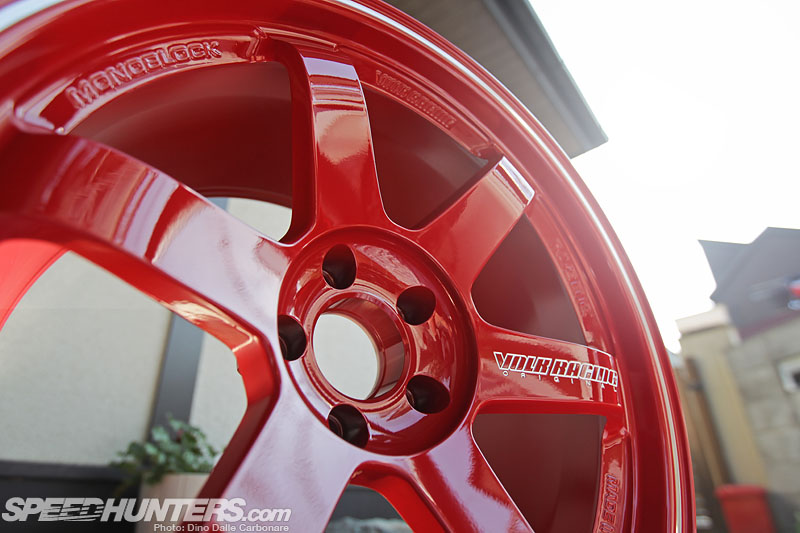
It has happened to me many times before and I’m sure a lot of you have had the same experience. Brake dust, in its varying abrasive forms, is one of the worst contaminants for your wheel’s finish. It eats up at the surface – be it paint, chrome, polished or anodized surface – and before you know it your shiny new rims aren’t that shiny any more. Anything from slight pits to more severe penetration of the finish can occur and this is just not something I want to see happen to the red TE37RTs I have just fitted to Project GT-R.

So prior to having the tires fitted to the rims last month I wanted give the Kleers Aero Performer a try; a coating designed for use on race cars to help keep foreign debris from sticking to the body. I figured if it’s designed to create a sleek protective coat on a car’s body it would work just as well on wheels, making the removal of brake dust and other grime that gets caked on less of a pain.

So I got to work. With the rims being brand new I was starting off with the best possible finish for such a treatment but still, even if sporting fresh paint, there was still a tangible oily film over the surface. For anyone that has dabbled in DIY detailing you will know that dishwashing soap’s ability to attack oil makes it a great product to get rid of any impurities or to strip old layers of wax. So armed with this…

… as well as a few handy microfiber towels…

… I got to work on the wheels one by one.

First step is to get the surface nice and wet, and you can already see here how the water was beading due to the aforementioned oily film.

Not wanting to risk putting fine scratches or swirl marks onto the new and still probably soft paint, I went ahead and soaped up the TEs by hand…

…. gently rubbing every bit of the surface: front, back, the sides of the spokes as well as every nook and cranny of the hub.

A quick thorough rinse…

… to get rid of all those suds, and I was left with a perfectly smooth and oil/grease free surface.

The Aero Performer package comes a bottle of Kleers Paint Cleaner, a good product I’ve used before to clean my car’s exterior, but one that I would not use in this particular occasion due to the wheels being in new and perfect condition. The pink microfiber towels included in the box are there to apply and wipe the surface before you get to the important process of layering on the Aero Performance coating.

The bottle may look small but you need so little to achieve the effect. Again two more microfiber towels are included, the yellow for the application and the green for wiping off and buffing.

I attempted to figure out what was in it by looking at the back of the label, but it’s all too complicated. Numerous teams in F1 and FIA GT have began using this product as it helps keep their car’s surface clean and sleek throughout a race by repelling rubber marbles and it’s been windtunnel proven to reduce surface drag by 1.4%. Might not sound like much, but in racing every little bit counts.

After having washed the wheels I set two of them upright and got busy.

I gave a nice shake to the Aero Performer bottle…

… and poured a little bit onto the yellow towel.

As per the instructions I gently applied a fine layer, making sure to coat and work the product over every bit of the surface.

As these are my track wheels I took special care to coat the backs/insides too. This is so when I swap rims I can easily remove the caked-on mess of brake dust, rubber and oils that usually accumulates on the insides.

Once finished I let the rims sit for about half an hour…

… so that the chemicals had their time to do their work and dry up nicely.

With it being 38 degrees C in the shade, things dried up instantly but I waited nonetheless; a great time to grab a drink and cool off a little.

When I returned a fine haze had formed over the surface, easily removed with the green towel and with almost no pressure. I’ve used coatings in the past on body panels and some have been very hard to not only apply smoothly but especially remove, often getting caked on and requiring lots of buffing, but the Aero Performer glided on and off without a problem leaving a high gloss finish which was silky smooth to the touch. Seeing as I had so much left in the bottle, I decided to apply another layer and it ended up going on and coming off just as easily as the first.

So there you go, extra shine and protection. However it wouldn’t be until after my Izu drive…

… that I would really tell if the coating worked and how well. This is the state of the rims that I awoke to in the morning after the mountain excursion.

I would usually blast them with water first but I wanted to see how much dust there was and how easily I could remove with a microfiber towel.

There was no resistance and it all came off very easily, but not wanting to scratch the finish I proceeded with water.
I tried another wheel and just with the hose about 90% seemed to just flow off.

My wheels are back to their shiny selves once again and that includes the insides!
Dino Dalle Carbonare
Instagram: speedhunters_dino


very proper way to clean
and very effective product
Thank you for this!!! I finally purchased my very first set of Volk Te37(eta a few months) for my Ae86 and i'll definitely will follow this.
speedhunters_dino ILoveDrifting19 Red rims on a blue car???! I would have went with gray or silver for a cleaner look.
speedhunters_dino Ewottaja If you had gray rims the dust wouldn't be as noticeable.