Welcome back Speedhunters! It’s been nine months since my last build update, so I thought it was about time that I brought you up to speed with the progress of my Hilux, which is now only months away from total completion.

In a build of this magnitude you go through so many different stages, some of which are more enjoyable than others. But over the last few months the project has really come to life.

The real engine for the build came from my PS13 and was ready to fit after a quick freshen up. This is a built SR20 with 9:1 compression and upgraded cams. I have had great success over the last 10 years with SR20s and they dont need a great deal of work to be able to cope with 300kW (400hp) and 7,500rpm.

What I wanted to change however, were the electrical components on the motor. After a heap of research I created a bolt-on system using a pair of GT101 hall effect sensors that read from a crank trigger wheel and single cam synchronization. It’s simple, robust and provides great resolution at both high and low RPM. There are no factory Nissan electronics anywhere on the engine now and all sensors are brand new, readily available and cheap off-the-shelf items. It was a good way for me to bring the now-aging power plant up to modern electrical performance levels.

Having the chassis mostly finished it was time to concentrate on the plumbing. Since I was building the the brake lines, fuel lines, air jack lines, coolant lines, oil lines and power steering lines all from scratch it was never going to be a cheap exercise. Over the span of a few months progress was dependent on the delivery man with most of the fittings and lines coming from the USA and the Earl’s Performance Plumbing catalogue.

I put a lot of thought into colours, style and fitment. The clutch and brake lines are all Earl’s AN3 aluminium hose ends with adapters for the master cylinders and banjos for the calipers. They are all dry-breaked so that the chassis can be stripped of parts, but the clutch and brake systems don’t need re-bleeding. Throughout this build I am always trying to think years ahead. As I am the owner, builder, driver, mechanic and fabricator I need to make life easier for myself, and small additions at this stage will make a big difference later on.

The oil cooler lines that come out of the Tomei block also feature Jiffy-Tite AN10 dry-breaks. This allows me to remove the entire front clip from the chassis with the oil cooler and Peterson in-line oil filter still attached and full of oil. The fuel and oil systems all run Earl’s Pro-Lite 350 hoses with Earl’s Auto-Mate with crimp collar ends. Massive thanks to the guys down at Hydraulink for the use of their crimper.

The air jacks use Earl’s AN4 aluminium hose ends and run separate systems front and back. I found that it would be easier to use a splitter and twin connectors so that I have the option to lift either end independently. Of course, because it’s a drift car the rear end will be lifted more regularly than the front. The power steering plumbing is also AN4 using high pressure PTFE braided hose from a local supplier. It took some working out to adapt everything to the threads of the factory system.

As soon as the plumbing was completed I stripped the chassis back to a bare frame. Then it’s time to wash it down in thinners and re-coat it in Lanolin to keep the rust away. That alone is quite a time time-consuming job and it might give you an idea of the hours I pour into this project.

Once the Lanolin application is finished it’s time to refit all the parts. There’s a very methodical process I go through and I know every single nut and bolt and the size spanner need used to remove or refit it. Removing everything takes about three to four hours and refitting everything takes about five to six hours in total.

After two years in the build it was a special moment adding fluids to the diff, gearbox, engine, brakes, coolant, fuel and steering systems. I was a little nervous opening up the garage before I headed to work the next morning, but no leaks meant everything was plumbed right.

In a series of events the power of the internet proved to take this build to the next level when it came to the wiring. I put the word out there on my blog and Instagram and was contacted by Andre and Ben from HP Academy in New Zealand. The guys had been following the build and after a few emails explaining what I had and what my goals were, they booked their flights to Australia.

What Andre and Ben did in those 10 days was nothing short of mind blowing. Andre pulled 14-hour days to create a Mil-spec loom that connected everything in the vehicle. I loved the way Andre worked – he is a very skilled and smart person and put everything into this loom, so I am very grateful for his time.

The chassis loom uses a Racepak Smartwire and switch panel to control all functions. The PDM uses solid-state switching to eliminate all relays and fuses with a laptop used to program each output. It’s powerful enough to run the fuel pump and thermo fans without the need for relays, and you also have the ability to set peak-load warnings and swap circuits automatically if need be.

The engine loom runs from the Link G4 ECU into an Autosport connector that mounts through the firewall and into the cam, crank, air temp, oil temp, oil pressure, fuel pressure, TPS, and MAP sensors. I’m also running a MAC valve to control boost via the Link ECU at 22psi. This isn’t just any loom though – Andre went above and beyond to give me a concentric-twisted and custom-labelled work of art using the finest materials available.

Andre then programmed the Smartwire to operate the systems I needed. This includes the headlights, hazards, brake lights and tail lights, along with the fuel pump and thermos which are both switched from the Link ECU. The dash is connected via CAN and reads everything from the ECU as-well as the Smartwire. If there is any issue within any system the dash will tell me. You don’t just plug all of this gear in together and it will work though – it took some time for Andre to calibrate all systems to operate together.

With all systems checked, Andre loaded in a base map that suited my engine. The time had come to fire it into life. With that press of the button two years and an unimaginable amount of hours my dream was alive and a feeling of accomplishment and relief swept through me. The SR20’s timing setup was working well and there were no leaks. I was the happiest man on the block!

There was no time to relax though as Andre and Ben’s 10-day stay included dyno tuning. In another series of events my friends Aaron and Craig down at DTM Automatics offered us the dyno to use, which also allowed Andre and Ben to teach me how to tune. I already had the basic theory from their brilliant online course, but now I was able to sit in the drivers seat and extract some real power from the SR20. It’s a very daunting experience being behind the wheel on the dyno, something heightened by the fact I was responsible for every single little thing on this car and I did not want to let these guys down. The SR20 ended up making 287kW (385hp) at the wheels from 22 psi, with a super strong torque curve that makes me all the more excited to drive it. In today’s world this may not seem like a lot of power, but it suits my budget and I know that this setup will be reliable for many years to come. Before I loaded it on the trailer I borrowed DTM’s corner scales, which revealed a weight of 850kg (1873 pounds).

Returning home from the the dyno I was in high spirits. I had only known Andre and Ben for less than two weeks, but in that time we became good friends and they have given me so much. I knew I was capable of building everything, but when it came to the wiring and tuning I was lost. They had not only taught me to tune but had given me a world-class chassis and engine loom that has lifted this build to the next level. Formula Drift Asia was on in Melbourne the following weekend so some of the drivers came out to help celebrate. Peer pressure and the need to christen the ground the Hilix was built on resulted in a fun evening.

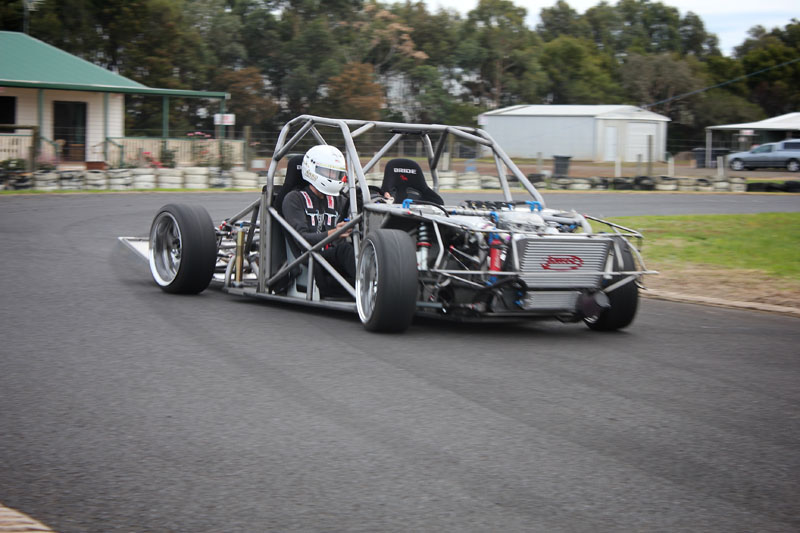
With Andre and Ben back in New Zealand, the Hilux running and the finishing line in sight, it was time to test drive it. I didn’t have the $1000 per hour asking price to use a proper race circuit, but thankfully Freddy Walsh of Cobden go-kart track answered my prayers and threw me the keys to the facility for a day.

Rolling the chassis out of my trailer in the small country town I grew up in evoked all sorts of emotions. In the last three weeks a lot of questions had been answered, but there were still many that hadn’t. You see there’s been no drawings, no computer-aided analysis and no professional input for this build – just my own instincts to build what I believe will work. In less than 10 minutes I would know how it steers, stops, grips and feels.

That first lap out didn’t just answer all those questions – the Hilux exceeded all my expectations and put a very big grin on my face. The power, the brakes, the steering and the grip are heightened by the lack of weight and intense rigidity of this chassis. I have been excited in cars before, but I’ve never had that maternal instinct of creation like I do with this. I might only be a car, but to me it’s something more. It’s my brain, my hands and my my persistence to never give up or give in.

After some small changes to the brake pedal location, tyre pressures and alignment I spent the day pushing the limits. Once the tyres heated up the performance was incredible. It seemed impossible to induce any understeer – you could just pitch it into the corner, unweight the rear end and it would be around the corner before you knew it.

I was able to use the track on the condition that there wasn’t too much drifting. That was unfortunate because I was so keen to grab another gear and really throw it around, but I was able to test and gain confidence during the day and you can learn an incredible amount about the way a drift car drives without actually drifting it.

Towing it home that night gave me a chance to mentally tick off the last two years work and continue to think about what was next. Although it would be fun to drive around with the wind in your hair it needed some bodywork, and in that respect my friends from IPTA Fiberglass have helped me out a great deal by taking moulds of the bonnet and front guards, like they did with the rear guards.

After the moulds were created they produced the panels. The bonnet is made of two pieces – a thin outer panel with an internal outer frame which increases rigidity. I can’t thank IPTA enough as the guys have done an amazing job. Not only have they produced the panels to an ultra-high quality, they also have given me the moulds, so it will be cheap and easy to reproduce panels after the inevitable happens.

With all the panels mounted up it’s a sight to behold. It has surpassed my expectations once again, and looks exactly how I originally envisaged it would. I love the factory lines of Hiluxs and I have always been about simple body aesthetics. I use Ball-Lock pins for a strong and simple mounting solution, which means the front bumper and entire rear clip both remove without tools. And yes, this is the final ride height. I will have two sets of front guards – one with the stock radius for static shows and another cut higher for drift days and circuit outings.

Of course, in behind the bodywork is where all the hard work lies. There were so many small jobs to do along the way – one of which was to add alloy panels around the coolers in order to direct air where it’s needed. Jobs like this are where all those hours are consumed. I build everything from 1mm poly-carbonate before transferring those templates onto aluminium sheet. I’ve kept all those templates too so everything can be easily recreated.

With the list of jobs decreasing, it brings me into a new era for the build. Once I am confident that everything is finished and I have not forgotten anything, I will strip everything down, hang the chassis and front/rear clip on a rolling jig and then wash and Scotchbrite it back to shiny steel. Then I’ll send that to the powdercoater for clear coating and the body and a spare set of panels to my local Paint shop for a coat of Toyota Superwhite II. Then finally, I can reassemble everything to create a finished product.

I’ve have had plenty of ups and downs during this build, but that’s what project cars are all about. They test you and drive you to the very edge of sanity. In saying that, they also enrich your life and give you unimaginable amounts of pleasure when you finally take the time to sit back and see what your mind and hands have created. I don’t have any fancy tools, a lot of money, or any sponsors. But what I do have is persistence and the will to work through the hard times. If you strive to just do one thing every day to the best of your ability, you will be surprised at what you are capable of.
Nigel Petrie
www.engineeredtoslide.com
OFFICIAL SPEEDHUNTERS SUPPLIERS


hats off to you sir that truck is .... I honestly can't say , is it the ultimate truck or drift or track I just don't know. what I do know is you have made some thing very great. 100% cool end of.
amazing... just... amazing.
Thanks for sharing the useful post with us.Great information about <a href="http://utpparts.com/"> Pt-6 engine</a>that you are sharing with us.
Thanks for sharing the useful post with us.Great information about <a href="http://utpparts.com/"> Amazing Pt 6 engines for sale </a> that you are sharing with us. It Was very helpful to me .