

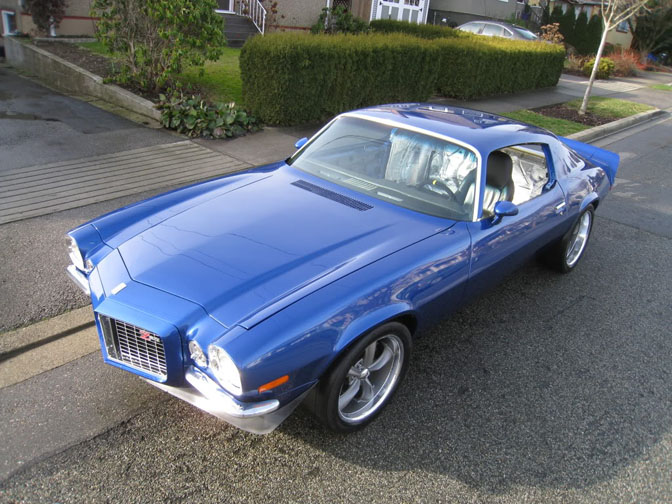
Hello Speedhunters! My name is Scott Murray, you may recognize my name from the story on my AWD sleeper mk2 GTI that was featured last year. This story however is not about me, nor is it about my car. It’s about my buddy Mark’s ’71 Camaro RS Z28.
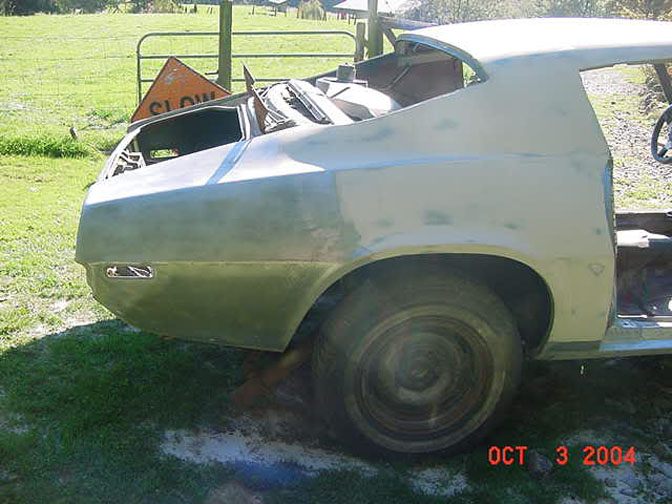
This project started about 4 years ago. The search for the donor car itself took the better part of two years. After missing out on several cars on Ebay, and checking out a few ‘rust free’ shells that turned out to be ‘metal-free’, a candidate was finally found.
Strangely, it was found 5 blocks from Marks house. The previous owner had owned it since 1977, and his brother owned it before that. The car was actually an abandoned project.
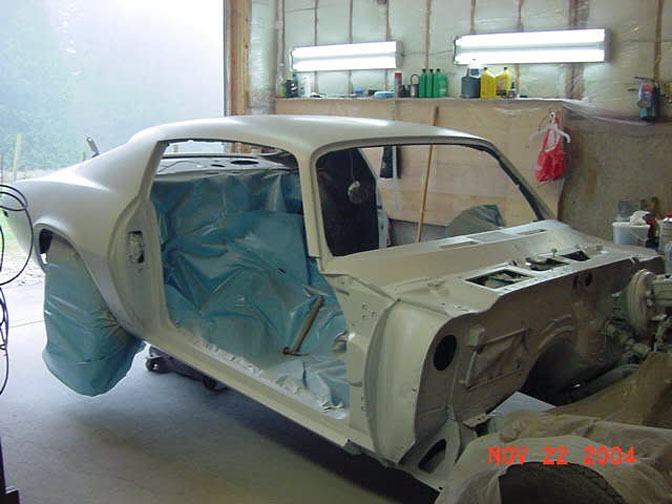
It had been stripped down, sandblasted, reassembled, with lots of new parts and powder coating.
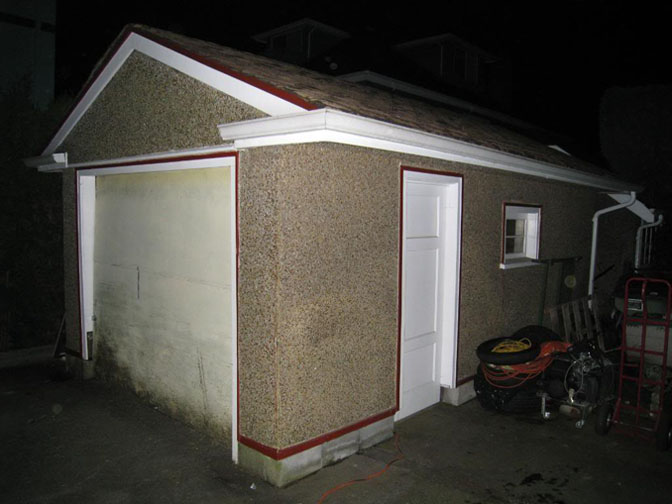
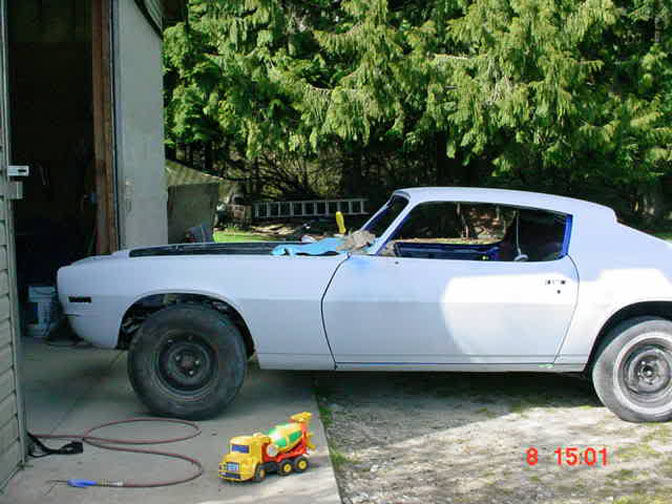
So the next phase for the project was for Mark to find a new house, one that had a garage. After 3 months of searching, a house was found (thankfully the previous owner had kept the Camaro in his storage during this search).
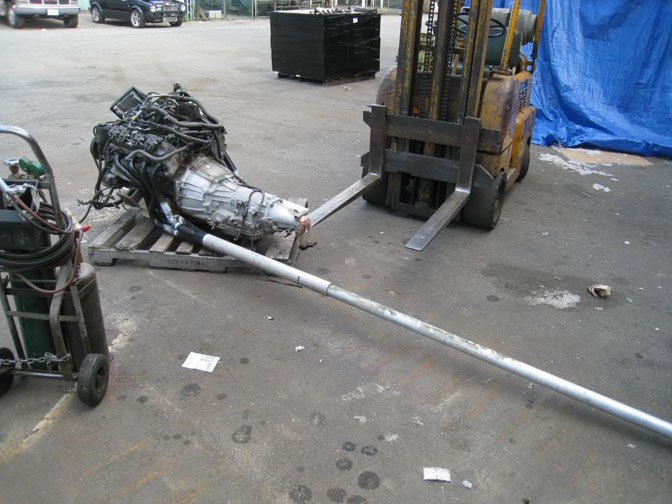
The car had a 327/4 speed at purchase, but that wasn’t what Mark was
looking for, so he went down to KMS C.A.R. Parts. Some wheeling and dealing was done, the 327/4speed as well as a 454/auto
was traded, and the new motor was found. The winning candidate was a
LS2/6 speed.
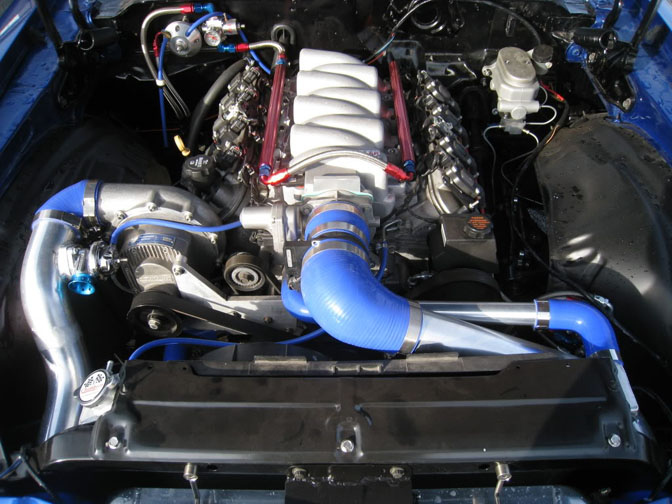
But before the engine would make it’s way to the car, it needed an
addition.
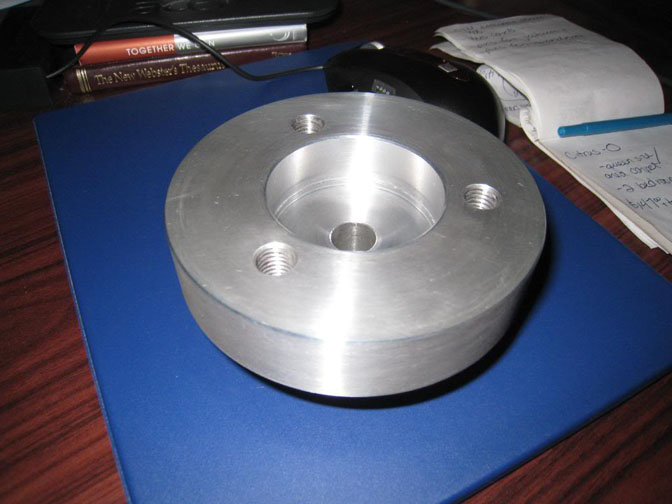
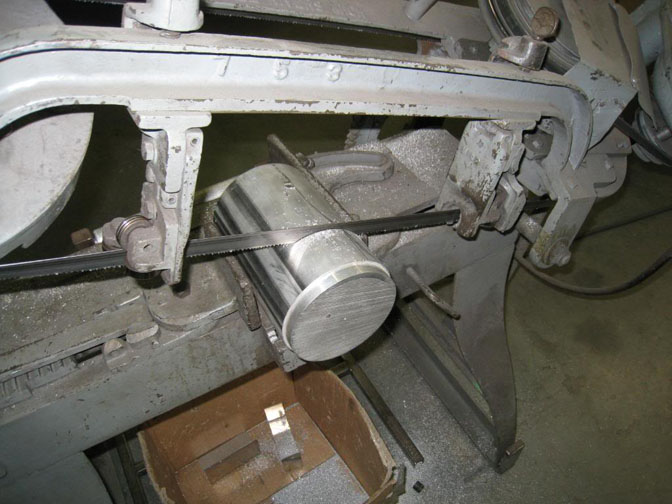
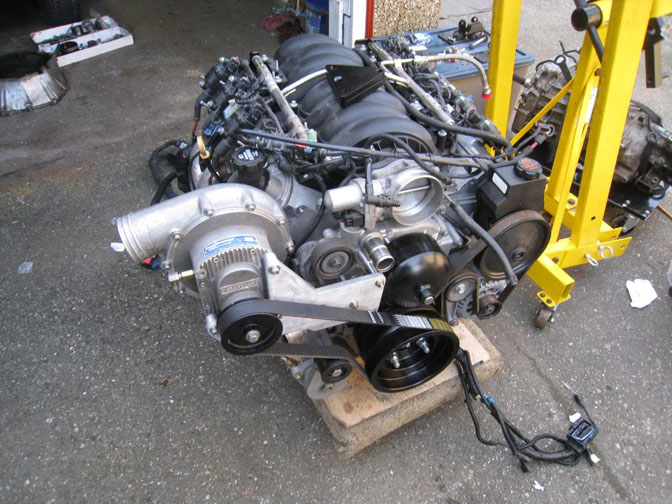
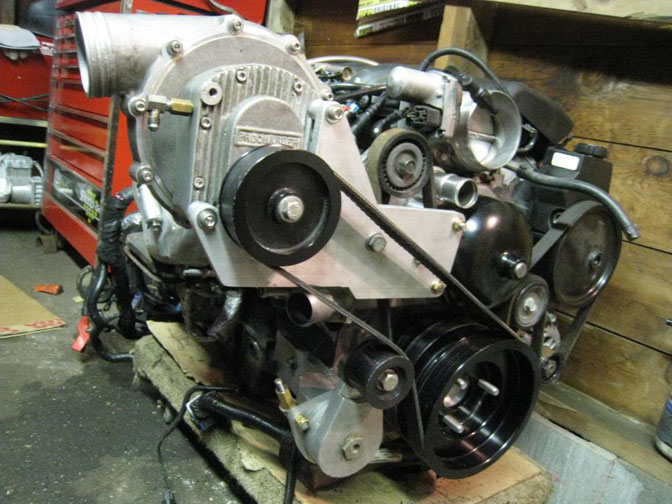
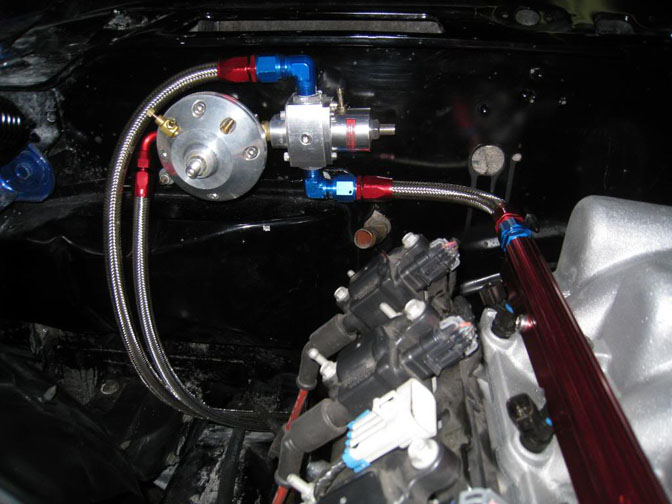
The first step started out as a 5 pound block of 6061 Aluminum, made
it’s way to the lathe, and ended up as a crank pulley adapter to allow
for the fitting of a M1 ProCharger supercharger.
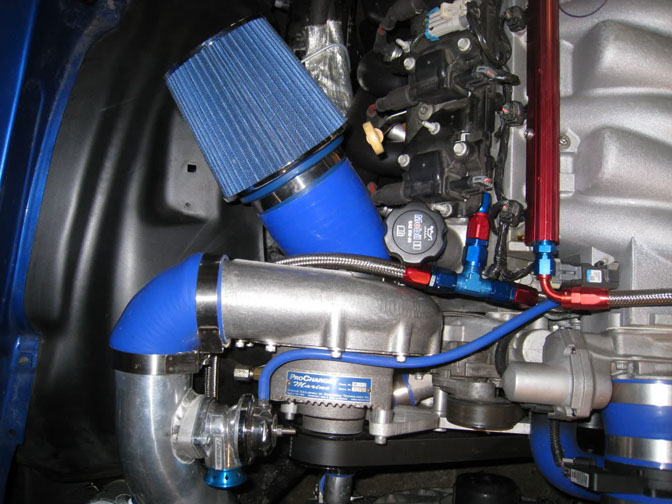
The charger was mounted on the passenger side of the engine, just over
the stock serpentine belt tensioner and a little outboard.
I should add that the Pro Charger mounts were one off mounts made by
Mark himself.
Since the motor is fuel injected, and supercharged, some upgrades to the
fuel system would be needed.
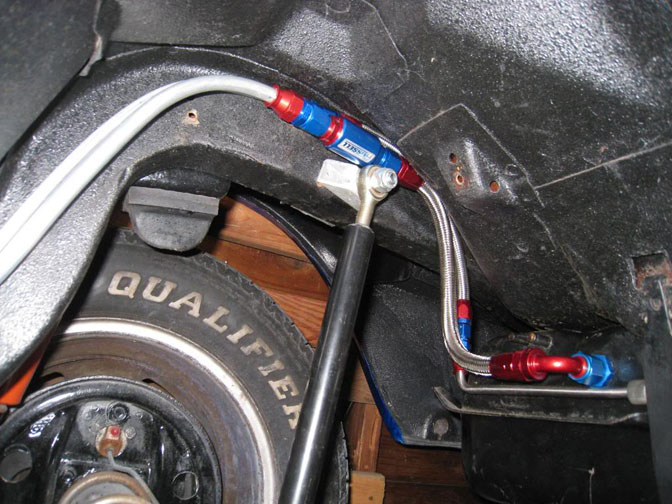
The in-tank solution would be a pair of Wallbro 255lph units set up in
parallel.
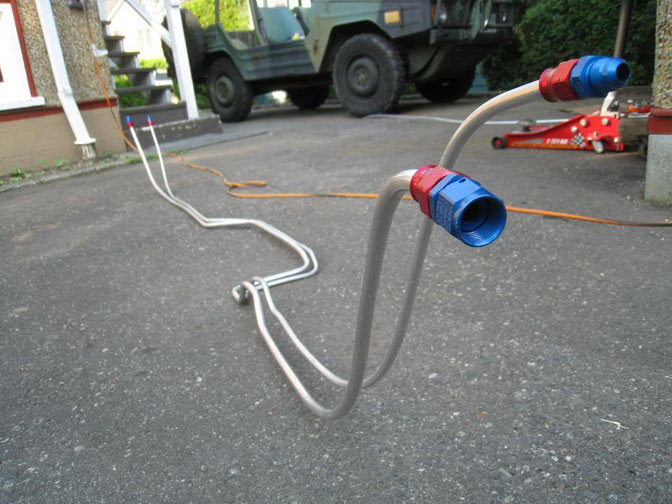
To account for the increased fueling the Procharger would require, a
rising rate fuel regulator was added along with a return fuel system.
One of the goals for the project was to keep everything as clean
looking as possible.
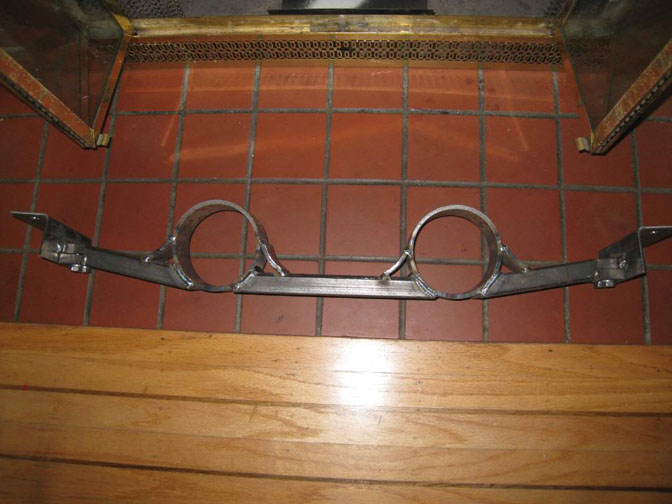
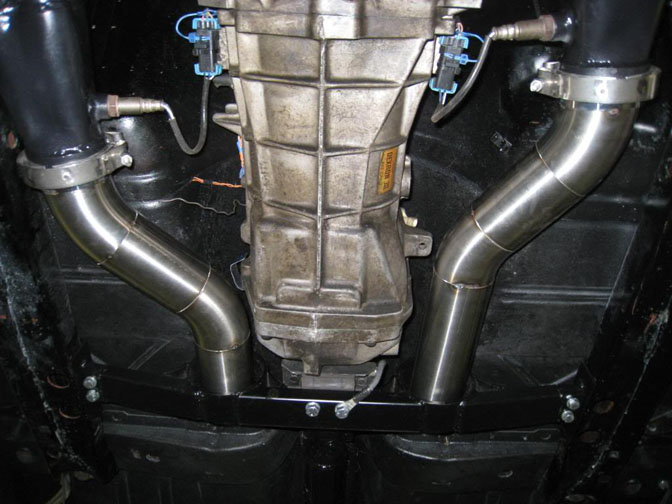
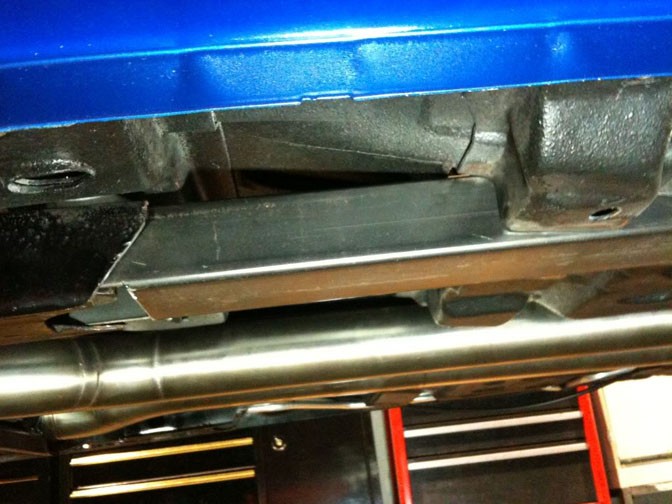
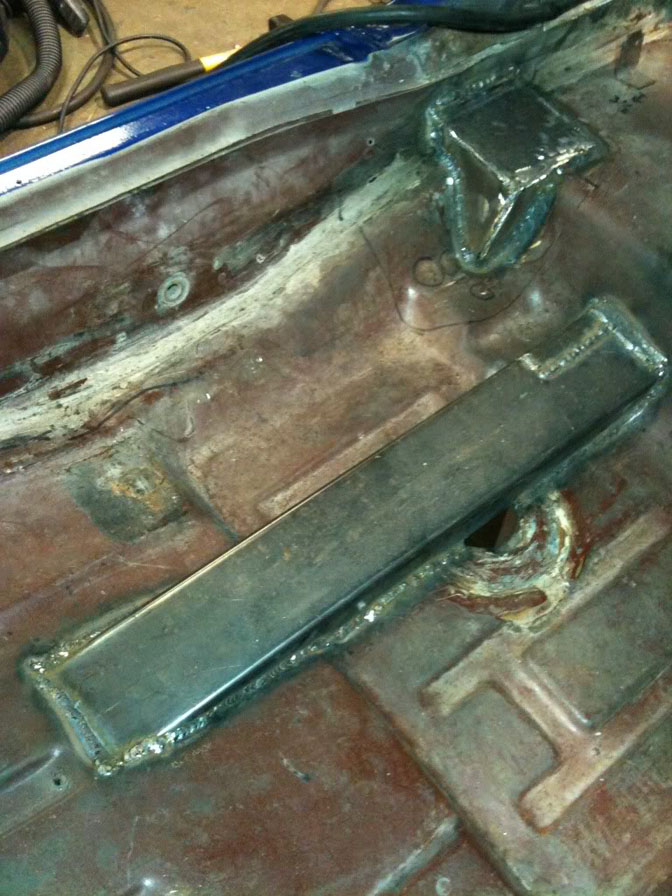
With one of the first things to be built in this theme was the
transmission cross-member.It’s a 3 piece unit, took way too long, but
the result speaks for itself.
Not only did Mark create a strong and functional mount, but it also is a
pass-through for the dual exhaust system (not built at this stage).
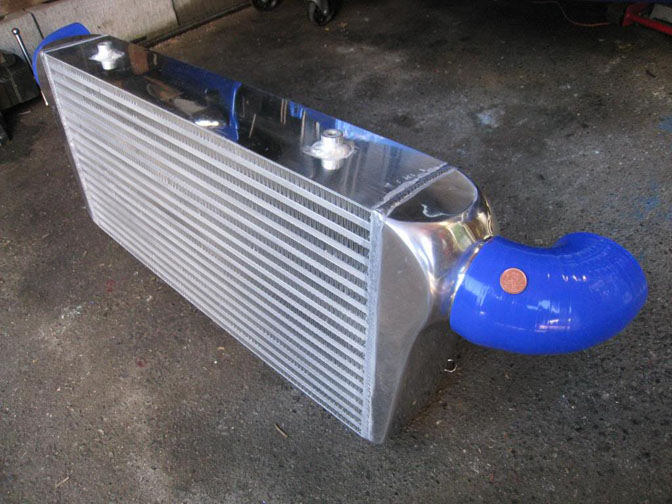
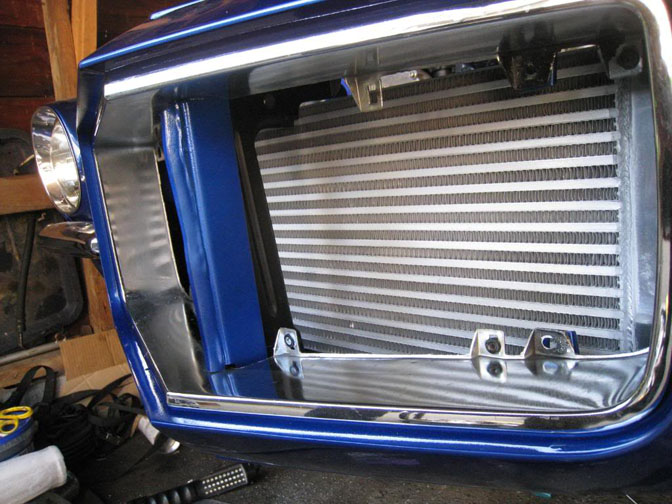
The next items on the list are the mounts for the intercooler, as well
as remove the stock hood latch to allow for clearance for the
intercooler.
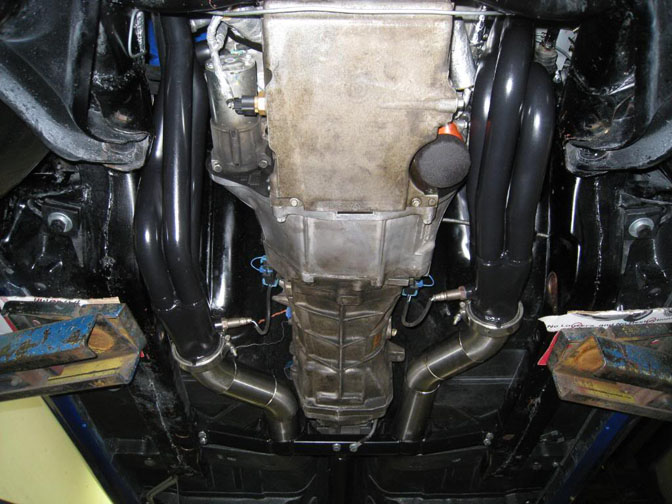
Since gen 2 Camaros, custom cross members, and a LS2 are not an everyday
occurrence, some custom headers would be needed.
Even with ‘custom’ ones readily available, there would still need to be
some ‘tweaking’.
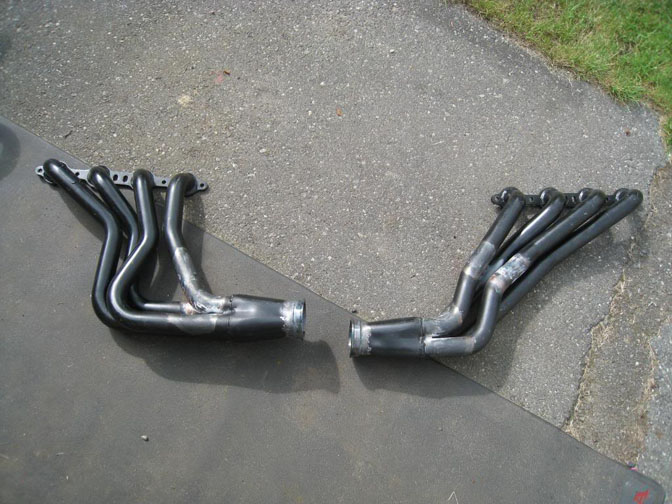
This involved a dummy motor, lots of heat, and several meters of
leverage. The end result was a set of headers that would fit more or
less perfectly.
Up next, was the exhaust system.
The car was taken down to Custom Metalcraft to build a one-off custom dual 3inch stainless system.
Anyone who’s ever build a custom exhaust can attest to how time consuming this can be, and this is how far Mark made it after a ½ day of work.
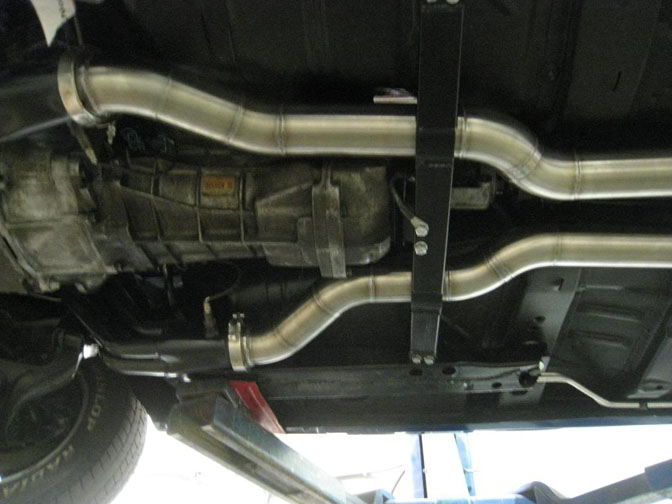
After a few more days of work, and a lot of time lying on the shop floor, the exhaust system was complete.
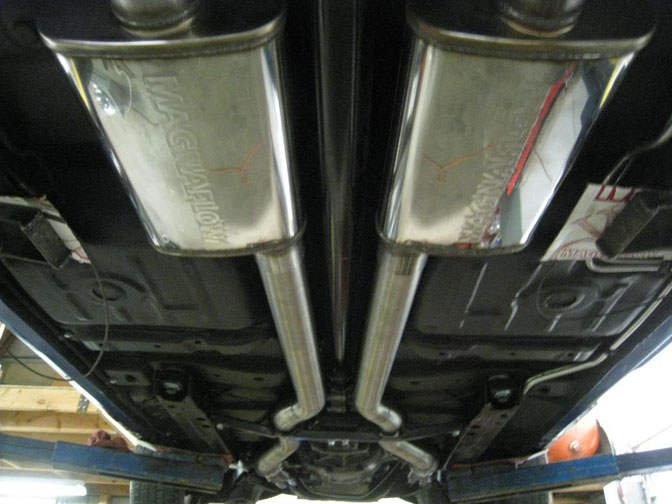
You can tell how much time and attention to detail went in to the system. It sits incredibly tight to the body of the car, both sides are square to each other, and even details like how the tips exit the body were completely thought out, and perfectly executed against.
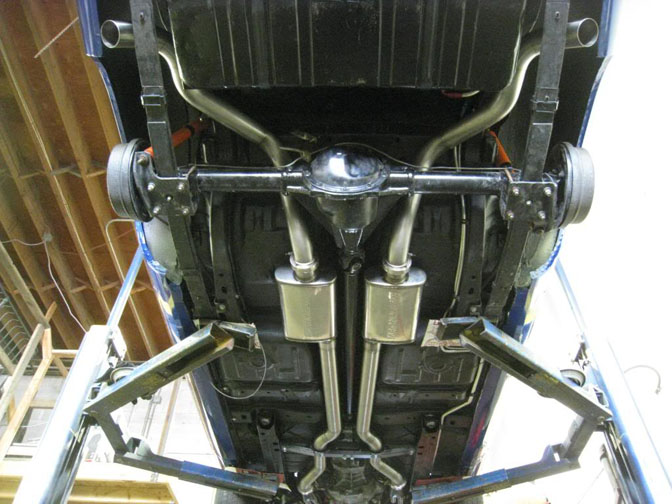
Mark has a few goals for the car, with one of them being that it in addition to being able to run fast ¼ mile times, it also has to be capable when it comes to Auto-X and track days. That means the next item on the to-do list would be the suspension. The front half of the suspension would be controlled by a QA1 coil-over setup with 550 lb springs. But because the car would be retaining its solid rear axle, the back half of the suspension would be augmented with a Hotchkis rear sport leaf spring kit, and a 3way adjustable swaybar.
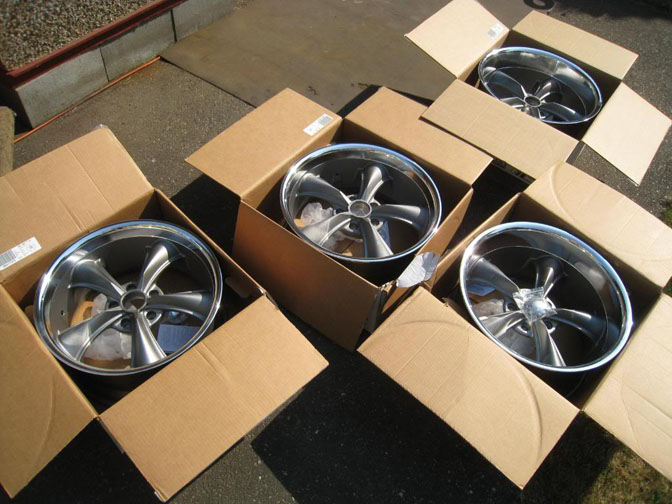
At this point the motor was in place, the supercharger was mounted, the exhaust was plumbed, and the suspension was in place, this left what is the biggest items on most enthusiasts’ lists. That item is what for most enthusiasts makes, or breaks any car– The Wheels.
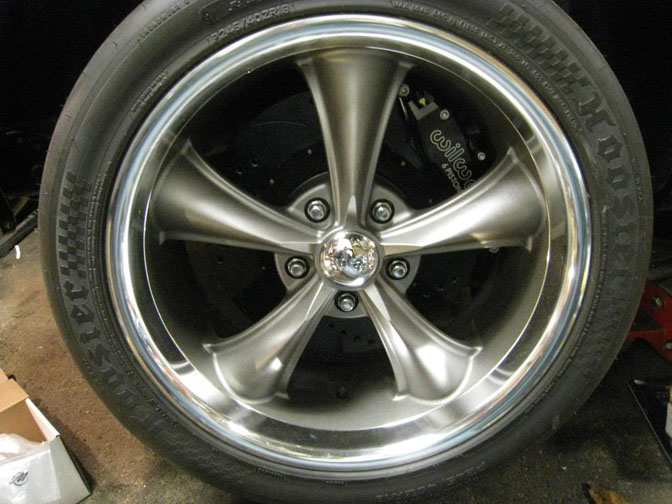
The goal was to buy something that would suit the classic looks of the ’71 Z28, but look appropriately modern, and allow for wide track worthy tires.
Mark went with a set of Boss Motorsports 338, with 18×8 in the front, and 18 x 9.5 in the rear.
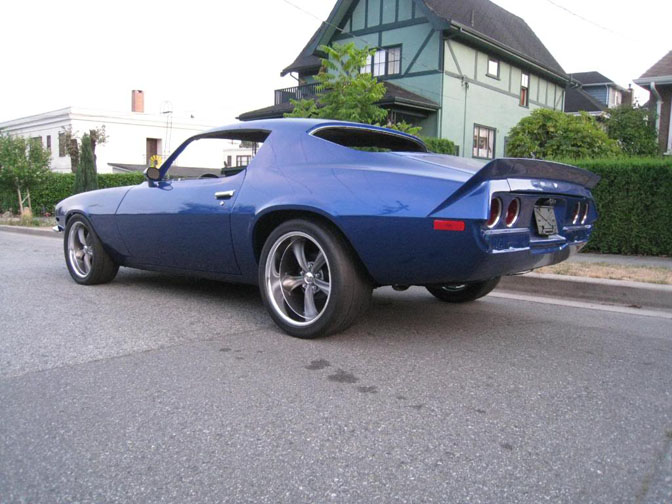
To keep those wheels attached to the ground are some Hoosier R6 DOT road race tires.
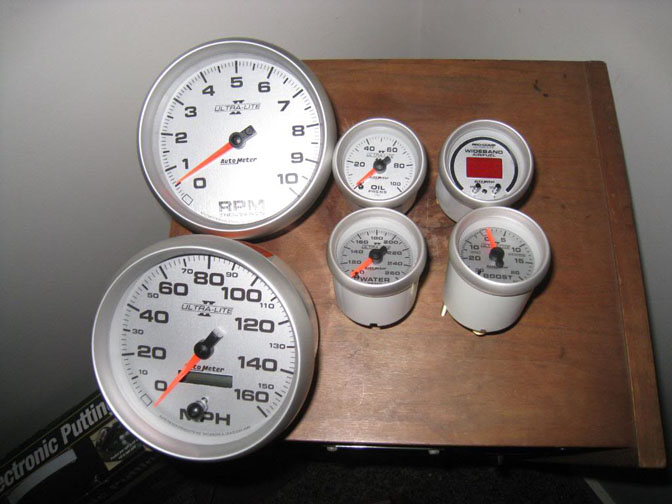
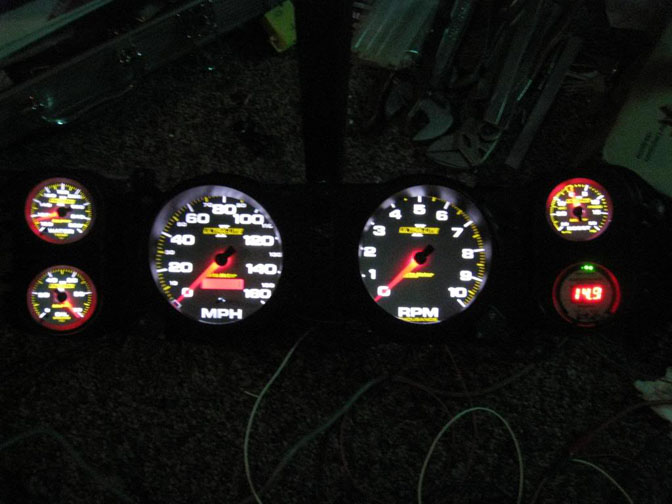
Once again Mark spent way too much time on another detail of my car. After spending a lot of time researching for new gauges for the LS2 conversion, and not liking any of the options available that much.
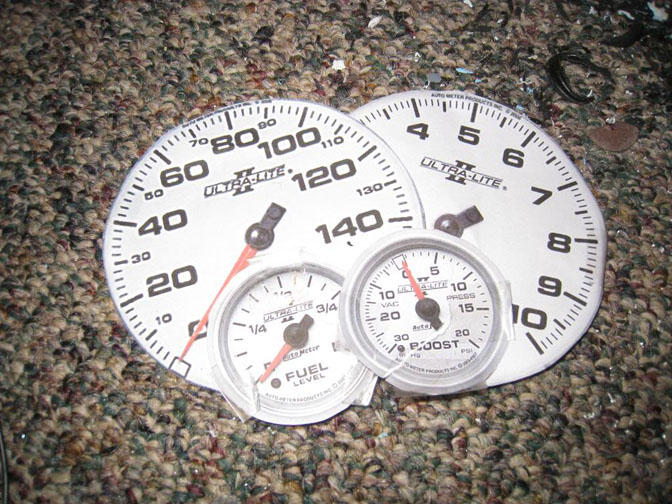
He liked the look of the stock gauges, but needed something newer. So there was really only one option left – put modern gauges in the old cluster.
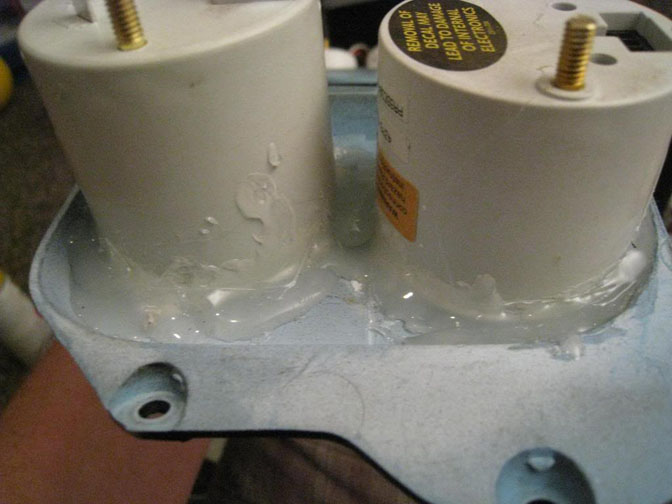
It’s not like that would be difficult, right…
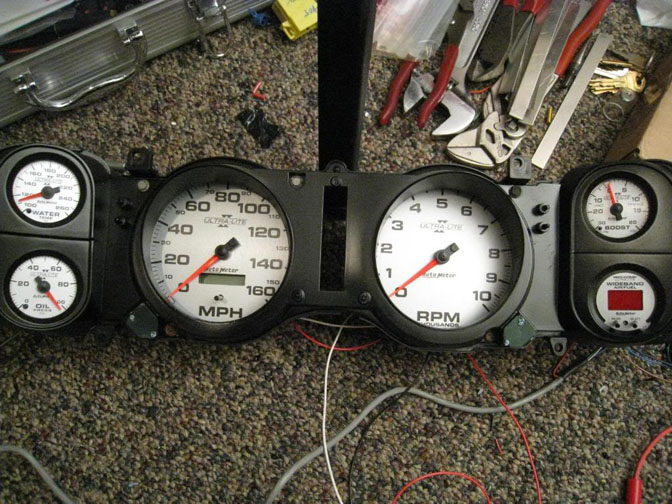
…Well 40 hours or so later, he had a completed cluster.
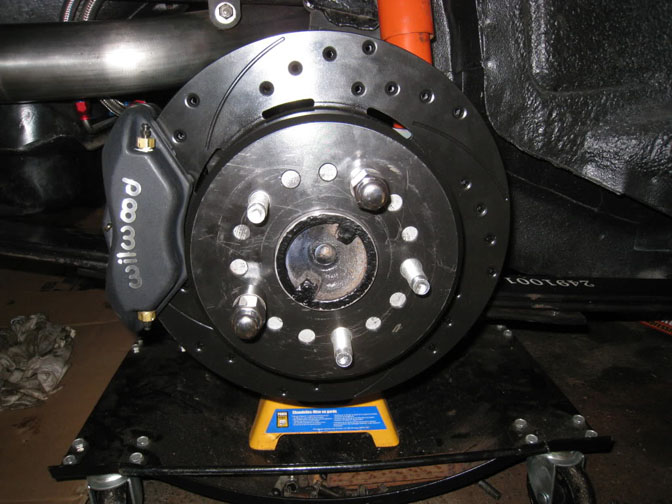
With the power that the car would now be making and the fact that the car could easily take the corners at any of the local track, the next item on the mod list would be the brakes.
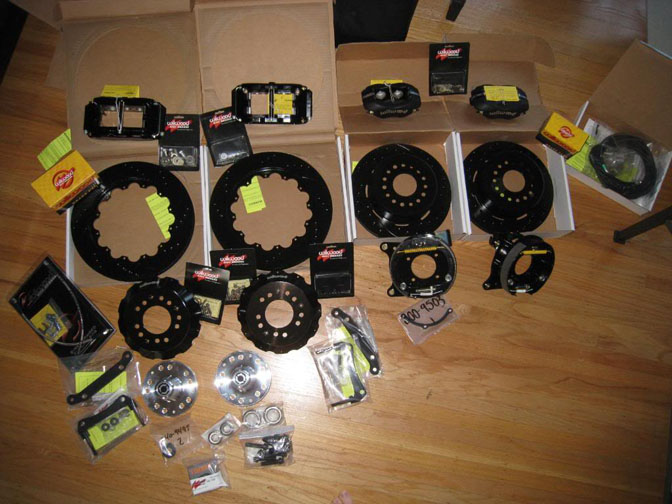
When you’re driving a 600Hp+ car, and have tires with a 40 tread wear rating, you can’t cheap out on the brakes.
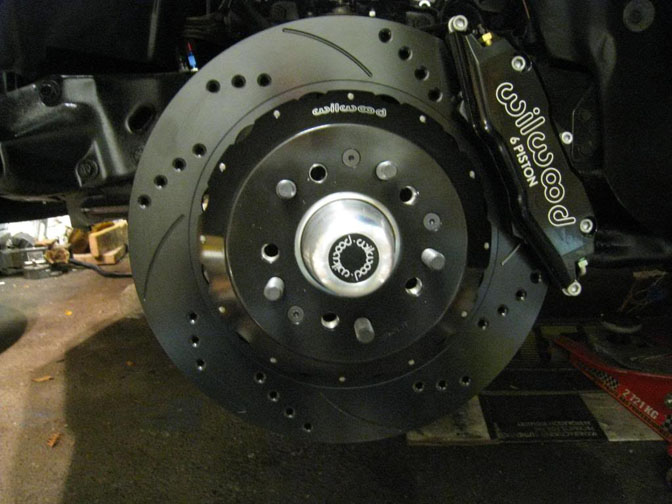
Mark went with custom setup from Wilwood. The front is a set of two piece 14” rotors with 6 piston calipers. The rear would be kept in line with a set of 12” rotors and 4 piston calipers.
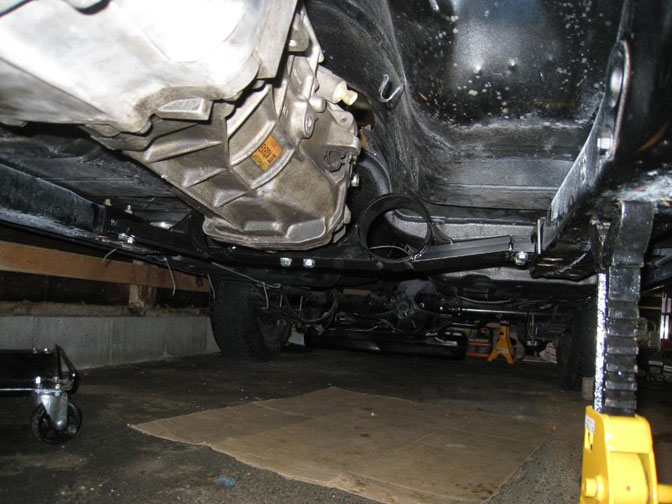
One of the weaknesses of these older chassis, is that the front half and rear half of the chassis are not connected.
The result is that there can be a substantial amount of twist in the middle of the car’s body.
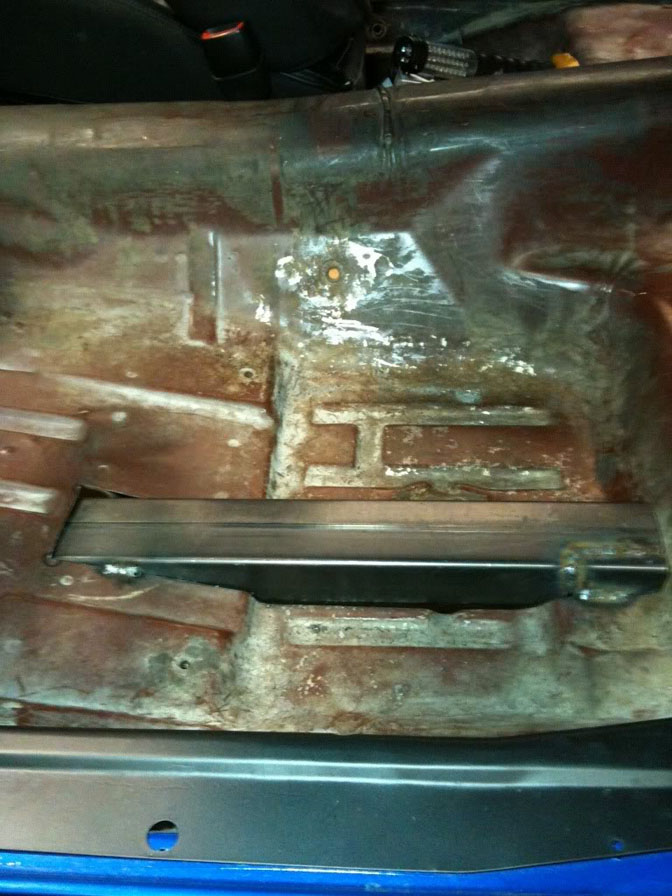
The solution for this is pretty common. It’s just a matter of welding in connector plates to the underside of the body, connecting the two halves. But there needed to be a sacrifice in order to facilitate this addition, Mark had to cut holes in the floor, to allow the connectors to pass through.
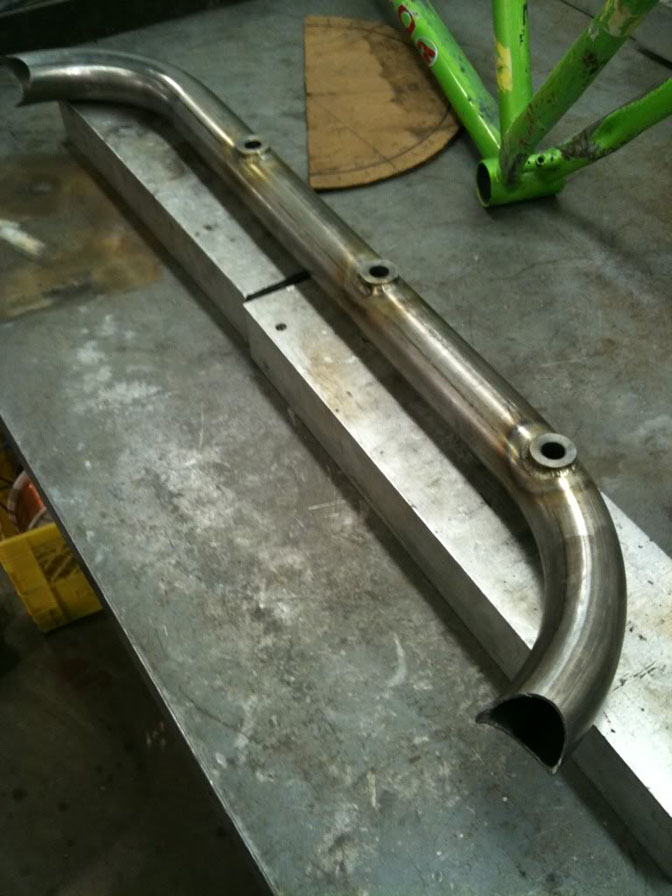
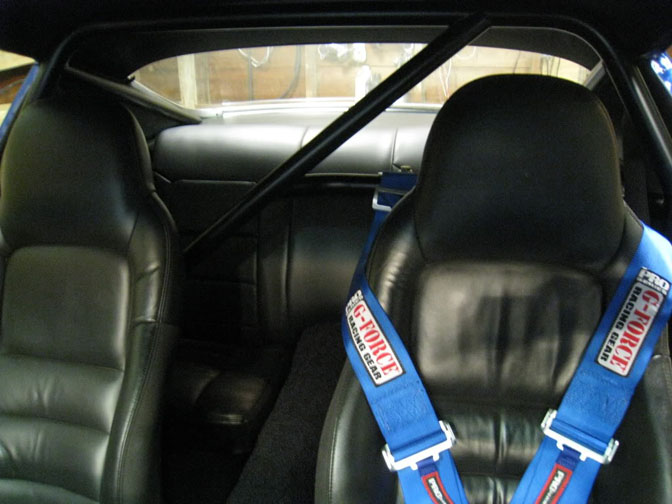
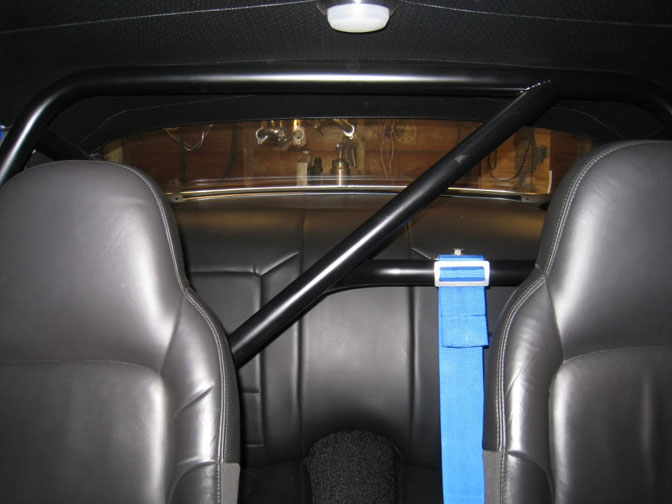
In addition to the connectors, and other suspension mods, the final piece of the handling puzzle came in the form of a roll bar setup. Because the car would be used mainly as a daily driver type car Mark didn’t want to do a full cage. However he wanted the chassis stiffening that a full cage would give, so a compromise was made. After measuring the car about 150 times, using several different methods for finding angles, a bending program was used to calculate the dimensions for the main hoop. Anyone who has ever built a roll cage will tell you how much work it is to get the main hoop correct, and how crucial it is – so this was a step that Mark spent a lot of time on.
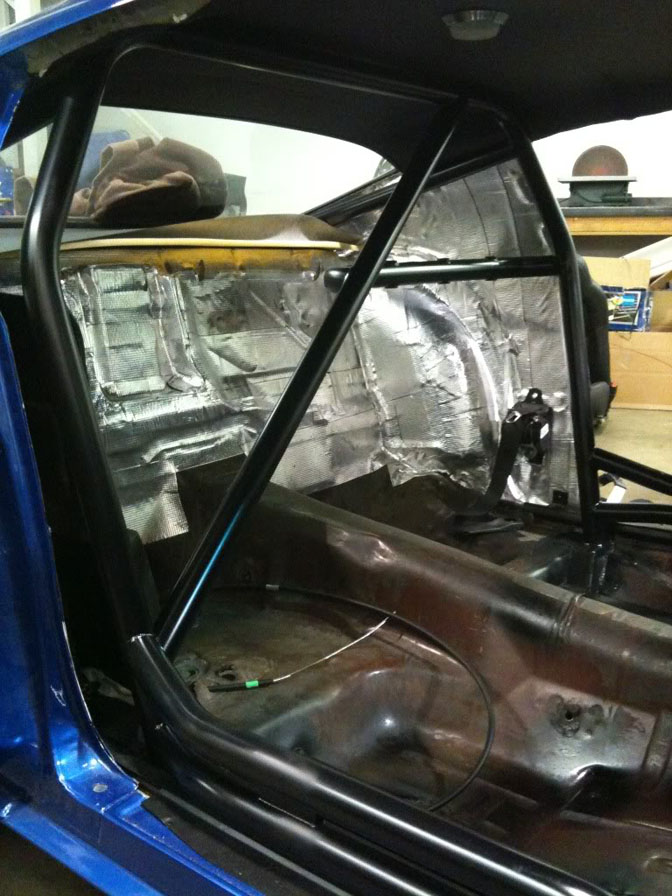
The next step after the main hoop was the rear supports.
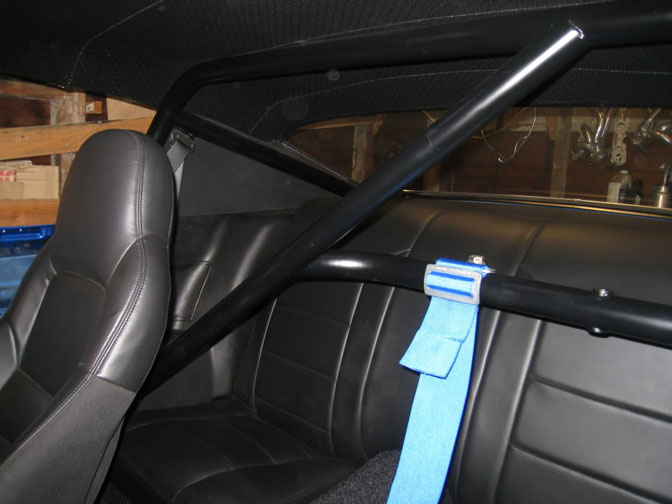
These were pretty straightforward, with the biggest hurdle being getting the cut-outs in the rear deck in the right spot. Because Mark will be using this car for track days, auto-x, and perhaps a few drag passes, it was going to need a harness bar, Rather than just a straight harness bar, Mark build a single hoop, with integrated harness anchors (trick, and clean)
Next step was -the compromise. Rather than building a full cage, or one with NHRA style side bars, Mark decided to do something custom.

The goal was to make forward bars to help stiffen the chassis; the hurdle was doing this without making the car a pain to get in and out of.
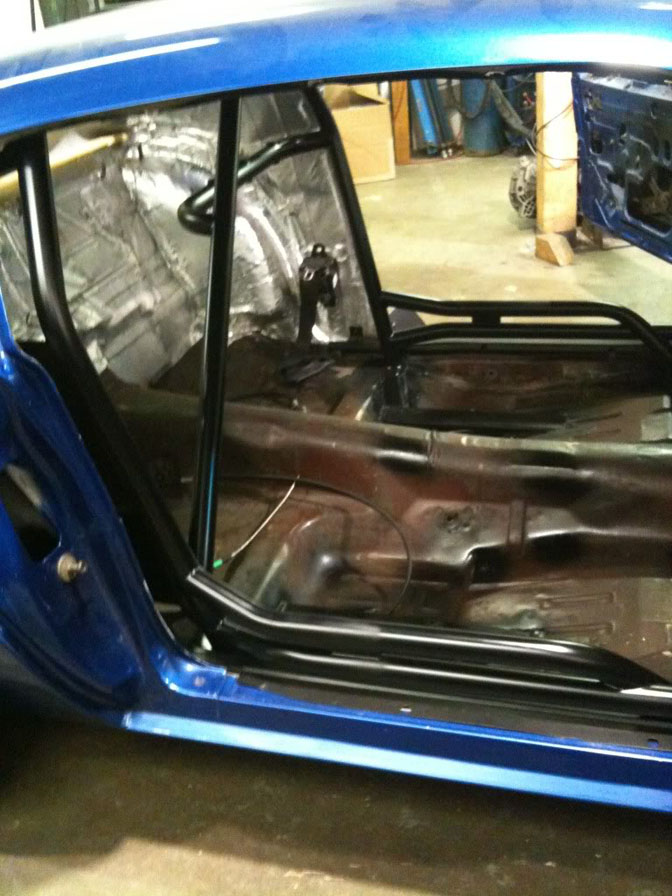
The solution was to run dual parallel bars to the front section of the car.
These bars would intersect each other, and have a gusset to stiffen them. The result turned out super clean. Not legal, but definitely unique.
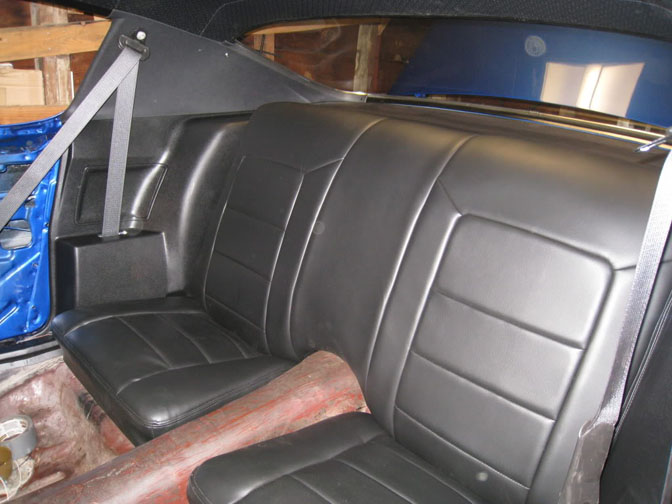
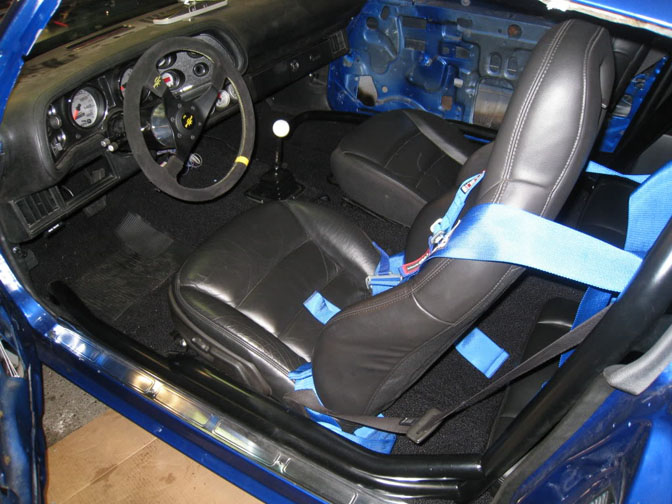
The ‘final’ piece of the puzzle is and will be the interior.
The headliner and door cards are done, all that is left is a bunch of small pieces, trim pieces, and a few odds and ends.
But let’s be honest, project cars are never done………right Mark?
Special thanks to KMS C.A.R. Parts (Coquitlam, BC) and Custom MetalCraft (Port Coquitlam, BC) everyone on LS1Tech.com, and of course NastyZ28.com.

For those of you who are interested in ALL the details of this build, check out Marks’ thread here.

-Scott Murray


I'm speechless! I love the transformations made to this already amazing machine!
These wheels are simply awesome and what I'm looking for. Unfortunatelly they come in 18" and bigger!! Does anyone knows a similar design in 16" rim size... ???
We want more projects featured in speedhunters!
Exceptional!
Truly remarkable ride.
The rims are the modern and typical "badass muscle car rims" and ruining that car with a piece of shit fuel injected engine is a disgrace.
Great car, great job! Good luck with next car =)))))))))))))
WOW! excellent build
EXCELLENT BUILD ! The attention to detail is amazing PLEASE MORE BUILDS LIKE THIS!
This is almost exactly what i would do with muscle car if i had one, great job!
d24 is right this is the kinda stuff guys like us like< these super-mod muscle cars. They are performance beast, but its still classic!
YES - YES - YES! Awesome build! I wish I would have documented my Buick Regal Protouring build so I could have posted it...
Ahh It's so clean and beautiful!
so much work is profitable as you see,the end result is just stunning.
I would adore this car every time I see it.
So, the car is dual charged ?
Amazing.
Wow. all that work and the end result is something out of a Chip Foose wet dream. Wheels are definitely not fitting that car's intended image. I'm not one to be bothered by modern performance adders on a classic build; restomods have their place. But the car has absolutely no flow with the ricer blue paint and monster truck wheels with rubber band tires.
If you want a good example to go buy look at the F-Bomb. execution on that car is nearly perfect.
This is the first time i like this gen body and likes it a lot ! Amazing build ! Post videos if you can !
so the gauges are hot glued in?!?!?! how long will that last?
car looks awesome.. love the front end and the rear.. nice colour too... some good quality spanner work in there!!
MOARRRR
Great build!
Nicely done!!!! I can always appreciate a ground up project. Kudos to Ryan!
Shoulda kept the engine stock, instead of all that fuel system shit.
It woulda been ALOT better (and worth alot more) if you didnt mess around with all that custom stuff
awesome z-28, love the split bumper models. asthetically though it does have sort of a run of the mill camaro look. so if the "sleeper" look was in mind mission accomplished. more unique wheel choice and stance would make this car perfect.
is this in Canada? i spy a VW Iltis in the background
sick build! i like the combination of old and new.
Yea Slug it says special thanks to those shops in Coquitlam, just outside Vancouver. Also @ Dickie: Could you enlighten me exactly as to what color "ricer blue" is? I have never heard of a paint color solely for ricers it must be some kind of top shelf info that only you and your buddies know about right?
@F3INT lol u mad?
insane build, congrats for having an amazing car!
Great build, thanks
im liking that im seeing more canada on speedhunters
son,
i dont believe F3int is mad, it appears as though he's mocking you (and you're doing a good job of making that easy for him)
dad
mmmm thats yummy. great build!
an amazing peace of machinery, love every bit of the custom work done here, great job
Thanks for all the comments! It's been a lot of work and countless hours of research and planning before even picking up a wrench. Thanks for taking the time to write this up Scott! If anyone has any questions about the build check out the link to LS1tech above or ask here and I'll be happy to answer. To answer a few questions so far. It is a single ProCharger M1 charger. The guages are mechanically held in with metal straps (see the LS1 link) and the colour is Aston Martin Viper Blue Pearl Metallic (which is very close to mid eighties iroc camaro blue)
The front seats are corvette seats
race harnesses with a seat like that are all but useless and a big install no-no.
Yes I hope those are not the seats he is going to use on the road or on the track, any sort of impact and those are going to slide right off your shoulders. Try it yourself, do the belts up tight and then relax your shoulders and stick your chest out and you will slip right through them.
Also I cannot comprehend someone not building a full cage if its going to spend more than 10 days of the year on track, it is the only thing that will save your legs, doorbars and front a-pillar bars are not a huge hassle to live with day today, and they only annoy girls getting in and out, but girls are even more annoyed if they cant walk after a RTI.
Dont want to be a nag just had too many good friends injured for life from silly mistakes. Excellent work on the engine and fuel routing, put it into your safety as well!
Pretty cool...second gen Camaros have grown on me recently.
I love the old muscle building cars.
About the Harness and Roll Bar. I put the harness in for use with a race seat in the future. I only use the standard belts on the street. As far as a full cage is concerned, unless it is strictly for track use, it becomes more dangerous for you if you aren't wearing a helmet. I'm not going to wear a helmet on the street, and this is primarily what the car is for.
I love the car, came out great. I would put a little wider wheels on there, at least 18" x 10", and change those front seats to bucket seats with the holes to fit the harness correctly. other than that, nice looking Z
hey Mark - great project! do you have any power numbers yet?
also, seems like a ton of work to stick w/ the leaf-spring setup. any plans to got to a 3 or 4-link in the future?
Disregard my comments, I realized today that the Internet is Serious Business and that I have nothing better to do than sit around on my PC day after day, looking for opinions that differ from mine to attempt to argue uselessly and ineffectively. My sad attempts at humor and wit are actually thinly veiled cries for attention and approval from my peers - none of whom i actually know or interact with in person - and I am admittedly ashamed that I could not come up with anything above a high school-level insult and school yard tactics revealing my issues with my own father (curse you for taking my innocence, DAD!) given hours of time to lick my wounds and cry to my plush pokemon afficionada.
I will more than likely make another weak attempt after this to repeat my stature as the Guardian of ALL Factual Knowledge with other posts following this one; please forgive me and disregard those as well. Truly, the real matter at hand here is the car in this post. And what a car it is! All of those pretty steel braided hoses and colorful fittings reflect well on the deep sparkly paint that reflects the owner's insecurities beautifully. The wheels are JUST the right size and shape in every respect for a totally pimped-out ride such as this. The Donk stance and fat chrome lip are just BEGGING to devour the nearest curb at the behest of the owner who is, no doubt, skilled in the area of dope burnouts and fishtailing powerslides. I believe it was Bow Wow who put it best: "If you ain't outta control, you ain't in control." Certainly words to live by - I know I do.
Yes, if it weren't for the fact that the builder of this rare specimen of auto is already balls-deep in my throat, I would gladly embrace his scrotum and swing carefree from his chromed and candy painted balls. After all, without people like me around to fanatically ram my opinions down any dissenters' mouths before they can so much as utter theirs, would cars and mechanics like those featured here even exist?
I haven't got any power numbers yet, but the motor stock is 400hp and the charger should give it at least 150hp more (I hope). I went with the leafs for now as I haven't found a 4 link I like yet, plus after doing some research it seems you can get the leafs to work not too badly. (google Mary Pozzi, she has a camaro that does really well in autoX with leafs) I will go to a 4 link in the future though.
Oh, that is SWEET. I especially love the engine work.
This is an amazing project. The Camaro looks great. It's hard to find a classic Camaro like this in such good condition.
Ron Johnson | http://www.nisteel.com/fabrication.htm