
It's been too long! I miss you guys… sniff sniff. Life has been busy, lets just say that. However, I DID finally get some major progress done on the car in Jan/Feb. Back in January after I finished most of the prep on the body shell, my buddy Colin Jensan came by my shop and schooled me on the ways of MIG welding. I haven't done any welding since high school, and even then, my experience is very limited.
Armed with a small Lincoln Weldpak MIG machine I went to town on the chassis stitch welding it everywhere possible. This is an important step on a car this old to help stiffen up the unibody. I was amazed at how thin some of the sheet metal used on these 2nd gen RX-7's is! Very easy to burn holes through it… trust me, I know. I did however become proficient filling holes with a MIG and a flapper disk! The whole stitch welding process took me about a week worth of evenings, this could be done in a few hours if it wasn't for all the surface rust, seam filler, and crap filling all the seams I was welding. It's important its as clean as possible to get the cleanest welds, a clean weld = a stronger weld.
As some of you might know, the Olympics were here for 2 weeks in February, I took that opportunity to take 2 weeks off work and create my own Olympic event, cage building!
The first Saturday of my time off I loaded the bare shell onto a U-Haul trailer and hauled it out to Abbotsford to my friend Colin's shop. Colin is the master of Porsche 928's and is a general all-around smart guy when it comes to metal fabrication, and all sorts of other crazy things. Once we got the car into to the shop, we spent the first day fabricating a hydraulic tubing bender from a die, some 2"x1/4" steel, some 1" bolts, a hydraulic ram, and a forklift, the forklift is essential in any tubing bending application. Check out the video of the first bend: Video
We used the forklift as its hydraulic system would be more than up to the task of actuating the hydraulic ram and bending some 1.75" x 0.095 DOM tubing. Colin added a couple quick connect couplings on the hydraulic system and within minutes we were up and running. I have to give all the credit to Colin on the idea for all of this too, saved us a lot of money vs buying an off the shelf system and it took less than a day to get it running.
The cage I built was using the SCCA rules for production class cars, as the FC RX-7 is still used widely in the E-Production class across the US. The differences between the Production rules and Improved Touring is primarily how many places you can attach the cage to the chassis, and penetration of the firewall, the latter Touring does not allow but makes a big difference being able to tie the front suspension to the roll cage and the rest of the chassis.
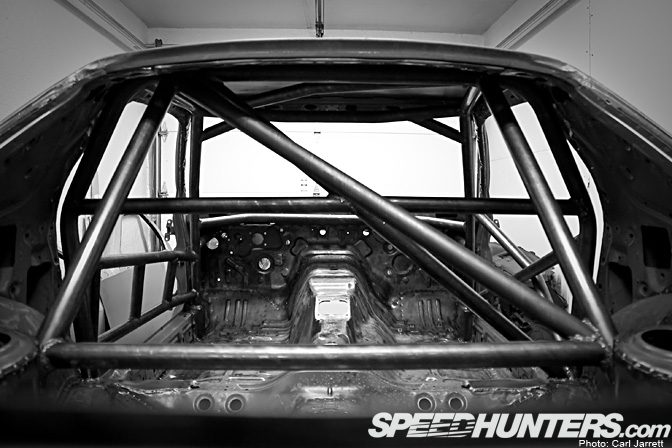
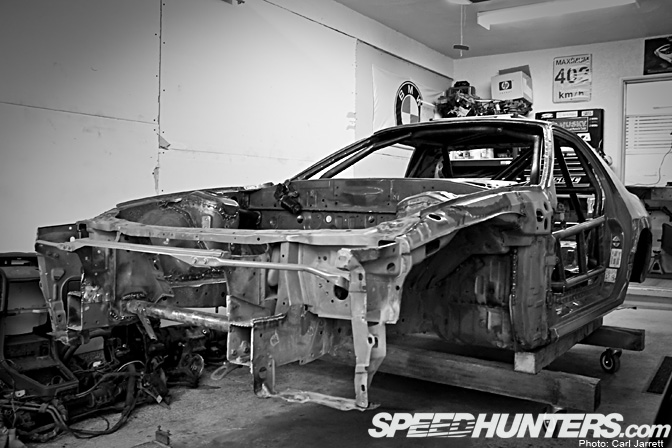
The cage itself is pretty much done, but there is a lot of work remaining to gusset everything. I will be taking as much advantage of the Production rules as I can, tying the cage to the chassis at the A-pillar, B-Pillar, the trunk floor to the cross member, the roof halo bar to the roof itself and more. I am waiting for a couple tools to come in so I can finish that part of it.
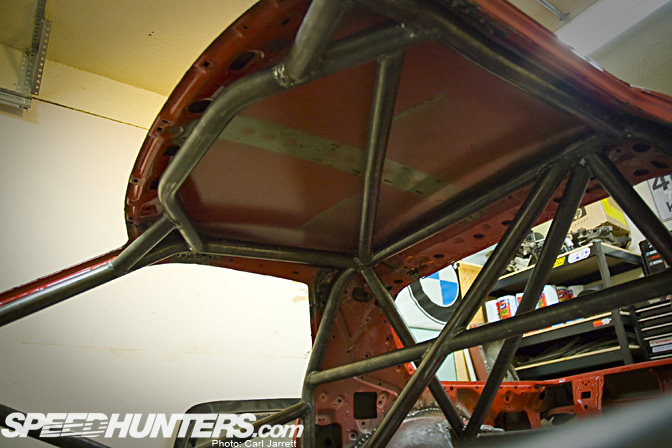
One thing I had to consider when building the cage was my height, as SCCA rules state, the top of the main hoop needs to be 2" higher than the driver's helmet. Being 6'4", this isn't straightforward in a car like this. We actually clearanced the roof quite a lot (with a ball peen hammer no less) to fit the main hoop as high up as possible. I think we did a pretty awesome job, considering the lack of clearance between the top of the cage, and the roof of the car, there isn't much more to be had, unless I cut out the floor panel and drop my seat lower!
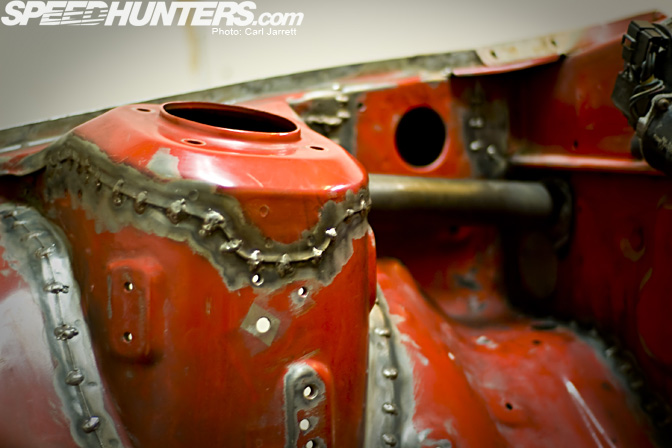
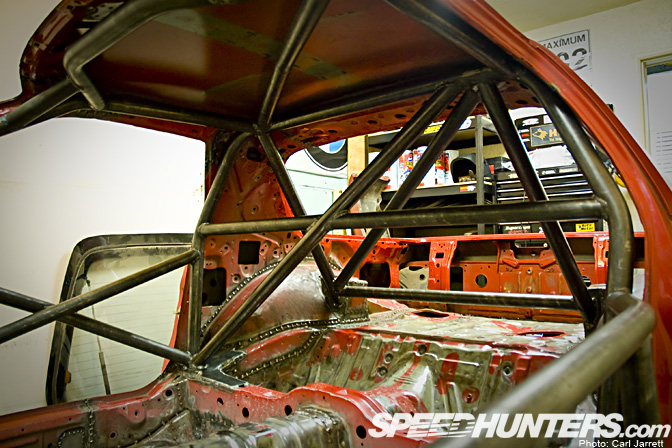
I'm also going to attempt to fabricate a removable front suspension cross brace that ties into the main cage through the firewall with plates on each side once I figure out how much clearance I need for the engine. Here you can see some of the stitch welding and the tube that ties the cage to the front suspension. Colin welded this at the firewall as well which helps seal it up as well as adding a small amount more rigidity at the firewall.

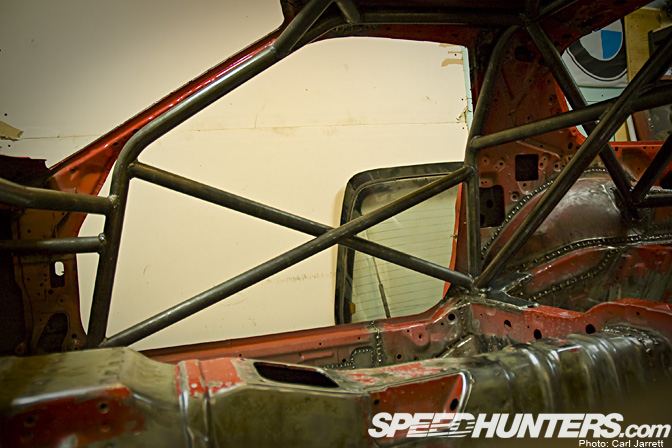
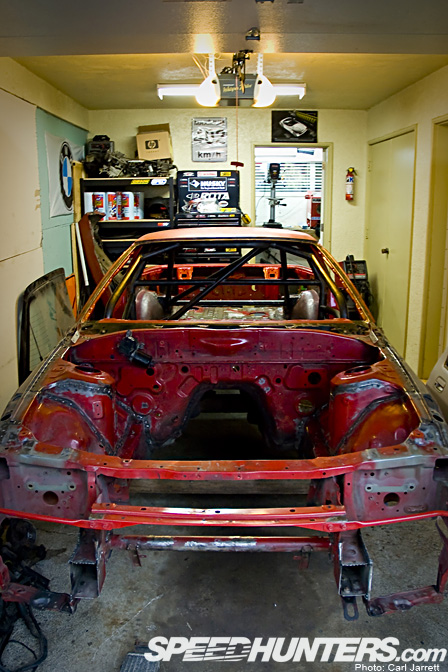
On the driver's side, we used NASCAR bars to protect the driver, and on the passenger side, did an X with continuous tubing. The X uses less tubing so is lighter weight. I did build the cage with weight in mind, but safety is number one. For my weight class in Production, they require tubing that is one size smaller than what I used which was the 1 3/4" 95 wall DOM tubing. I calculated the weight of the entire cage using this tubing versus the 1 1/2" 120 wall DOM and I would only have saved around 9-10lbs total.
While I was at Colin's 928 shop I took full advantage of some of the tools he had including his plasma cutter. I used the plasma a lot to cut out the plates for the cage mounting points, but also to remove a bunch of useless weight in the front of the car. I've gone through the whole chassis fairly extensively and removed anything unnecessary, which equates to over 50lbs or more of metal removed. Removing weight from the outer most parts of the car, especially the front, will help with weight balance, but also allowing me to keep more of the weight near the center of the car, in turn, helping the quickness and ability of the car to turn.
I'll be really busy in the next couple weeks doing all of the gussets on the car as well as getting it ready to prime and paint, however, I do have a few asks of you guys, of who have a lot of experience collectively, and individually I'm sure.
Do any of you have any hard data of how much difference the color of paint makes in terms of engine bay temperature, and interior temperature? Will it make a significant difference to warrant painting the entire car white? I'm still torn between painting the whole car white, or black..
What is the best paint and primer to use on the interior of the car and underside? I want something durable, that will stick to the small amounts of rust there is and neutralize it. Any tips on how to prep the car for primer and paint would be very helpful.
I've also been working on the concept of the car a bit, and working on the aero as well and will post some more about that soon I hope.
I also need to thank a few people. First of all, Colin Jensan for use of his shop, all that he taught me during the welding and cage building process, as well as lending his awesome welding skills for that 2 weeks. Thanks to Erven and Scott, who gave me some good tips that helped during the cage building process. Josh at RE-Tuning in Texas who has given me a wealth of knowledge from the few times I've pestered him with questions! My buddy who's been helping me with the aero, and my cousin Mark, a Civil/Structural Engineer who lent me his brain and helping plan the cage and gusseting. And my fiance for putting up with me not being at home for 2 weeks while I built the cage!
As always, love to hear the comments, especially the constructive ones, we all learn somehow, and somewhere, I use the people around me such as you guys to learn from, some keep it coming!
- Carl Jarrett
OFFICIAL SPEEDHUNTERS SUPPLIERS


Not sure if it helps at all, but my only personal experience with colors versus temperatures are with motorcycle gear.
There's no difference between body temperature between a white helmet/gear and black helmet/gear, nor is there a difference between laying over a black bike or a white bike temp wise.
There is, however, a difference in that wearing any white gear below the neck or riding a white bike, sun reflects a LOT more off white surfaces and depending on sun angle can damn near blind you while riding. I would suggest not painting the interior white, or at least leaving whatever semblance of a dash you keep black or matte so it doesn't blind you on the track! I've seen plenty of videos where the sun reflecting off a white dash glares up the entire windshield and renders the driver blind for half the track.
Where is the engine ? ^^
Im glad there is some personal work going on here at Speedhunters, The cage looks awesome, I love the front top loop of the cage with the triangulated sections pushed back due to the 2 bends in the loop, looks stunning, (taking note). Can't wait to see more.
colour makes no difference at all apparently regarding temperature
are you just going to be running this in SCCA? I'd love to see this at a Redline Time Attack event! Seeing builds like this makes me wanna leave work an rip apart my Civic!
Teknik is right on the money...having a white interior might reflect to much light from the sun in a small enclosed area and might give you trouble with your eye sight...try painting the enterior/engine bay a different color like light grey....kinda like some of the older Toyota race cars?but its an idea and will give you a cool color contrast...
I'm acyually gonna try my hand at painting once I take care of some stuff on the exterior of my s13....should be cool learning experience.
Well best of luck with the FC
Por-15 is the stuff to keep the rust down. My family has two 240z's (s30z) one restored and one in the process. we use it anywhere there is rust.
Teknik is right on the money...having a white interior might reflect to much light from the sun in a small enclosed area and might give you trouble with your eye sight...try painting the enterior/engine bay a different color like light grey....kinda like some of the older Toyota race cars?but its an idea and will give you a cool color contrast...
I'm acyually gonna try my hand at painting once I take care of some stuff on the exterior of my s13....should be cool learning experience.
Well best of luck with the FC
Love this build! Going to be a SERIOUS contender when it's done!
 Google for the RE-Amemiya Super GReddy FC 'White Comet' and have a look. Perfection in an FC! Some great cage ideas there too, not that you need any really
FWIW, I'd go White. I only say that because my FD is white, and when I build a track FD in this style, it will also be white
The build looks sweet! If you need any fab. ideas for the FC check out this page:
http://www.mazdatrix.com/epconv.htm
Start at the bottom. Should be a few little idea to help with your build.
From a thermal standpoint, using paint colour to improve heat reflection would be minimal. Best to just use a reflective tape in strategic areas of the engine bay where heat will be an issue. From a service standpoint though, white would be ideal. It will help you spot any kind of leaking fluid as it would definitely contrast on the white surface. The only downpoint is that you're going to have to keep it CLEAN... white gets mad dirty, especially around grease.. Might be more trouble than it's worth.
As mentioned by Jack, por15 is def your best option for rust neutralising, and prevention.
http://www.por15.com
Its great for using on the underside of cars as well, as its incredibly tough. Iv painted my subframes etc with the stuff. Nice work on the build btw, I am currently building a FC race car as well, and have been keeping a close eye on your posts.
Good luck!
White radiates the least amount of heat.
Why do BMW and Porsche paint all the factory race cars in white?? Now you know.
Loving the progress on your car, Carl.
awesome, dont stop!
Yeah like huang said I've heard a pro spec miata racer painted his car white so when he was at the track he could see straight away if something was leaking and where. Black you wouldnt be able to see that. I think this and the reflection Tekniq said are probably more important than heat. As a balls out race car I think aesthetics shouldnt come in at all
Geezuz look at the welds!
That is serious and would be very strong.
Ok, some people here seem to know nothing about heat. First off, the paint would not "radiate" any heat, radiation implies that the paint is generating the heat itself. Second, white paint will reflect more heat from the sun, however it could cause glare. I would suggest painting the majority of the car white but possibly a matte finish on the hood and definitely flocking on the dash.
I know a couple of teams who insist on painting their interiors grey or Silver to dull reflections down as indicated above. This would be my recommendation.
Black interior is a pain for spanners if they are fixing or building anything up in a (pit) garage as it kills alot of the light, making it hard to work with.
.or you could do something a bit different like Orange (Seen on a couple of racecars now) for sime high contrast to the exterior (not mu cup of tea, but just suggesting)
Why paint it at all? It would be a shame to cover up some of that hard work....ever thought of a 'rat' style fc race car?
Why do BMW and Porsche paint their cars white?? Same reason why a lot of other racing teams paint their car white, your livery stands out and is the best template for your sponsor's logos. Going solely for heat properties is going to yield negligible results.
At the very least, I'd agree with seaninc and flock the dash. You might also want to look @ rally cars interiors to not only give you an idea on dash material ideas, but the overall interior layout and how weight distribution is used inside the car.
you should paint it white, it allows you to spot problem situations in your engine bay a lot easier. I see pretty much little to no gain from going a certain color when it comes to thermal reasons. Por 15 is a great rust treatment method. I've used it in several cars. You should do a feature on the current E-production competition, and take a good look. I think that would help you in your build the most.
looks like yor well on your way.. the colour/temp issue.. there's all sorts you can do - i think you could spray it just about any colour and have decent uprated (lightweight) cooling system like the Rally boys do..
Look at that cage and stitch welding! Awesome write up! Great car and great pics. Very excited to see this car when it hits the track.
Stiffness won't be problem, at least that is what she said.
Use of a FLAT pait can also reduce reflection.
I would however paint the engine bay WHITE. This will beter reflect light arround the engine.
and clearly show where the leaks are.
Especialy when you have to fix something at night befor the morning race.
Paint color will not noticeably affect temperature. The majority of heat energy entering your car is coming from sunlight through the windows.
i can dig it
Looks like you know what you're doing!
Seam welding is definitely a fun task. I remember doing our GRM miata...holding the anglegrinder above your head to clean the underside while its on a lift sucks. The next car will go on a rotisserie for sure. Flap wheels are gods gift to grinders.
I've had a decent experience with POR15 on my locost frame. Prep work is essential, and brake fluid can still eat through it. In some places, it has flaked a bit, but no rust has appeared. Make sure you wipe stuff super clean to get residues off.
A body's heat absorbancy based on color is for radiation heat transfer. A shiny, reflective (polished metal, white) coating will 'reflect' more heat than absorb it, but the amount of radiant heat is pretty small with the temperatures in an engine bay. Painting the engine bay a light color will make it easier to spot leaks and stuff, and will definitely help brighten up the bay when it comes time to work on it.
Head over to MotoIQ and in their project car section they are building a Scion TC road car. I recall them going over some methods and supplies used in painting the interior and roll cage and hopefully it may answer some of your questions.
Love all the feedback, much appreciated everyone.
I never thought of the idea that the white engine bay would make it easier to see what I'm doing in there. Also being able to see leaks is good, I'm sure something will leak!
I will definitely be flocking the stock dash after I get it fitted between the roll cage. The glare even from a black vinyl dash is annoying.
With POR15, would I just cover the rust spots themselves, and then just primer the whole car?
Anybody have any pictures of a cheap home made rotisserie?
Again, thanks everyone for the great comments.
I had a firebird with an engine bay painted silver. made everything look trick.
Currently I have a black 240sx, black engine bay, black parts and an anoying oil leak.
And I can't see squat !@#$%!
Cage looks great.
You don't really have any idea about vehicle dynamics based on the following quote though:
"but also allowing me to keep more of the weight near the center of the car, in turn, helping the quickness and ability of the car to turn."
It seems intuitive that you'd want all the weight centrally located and as low as possible, but I think you might be adding ballast later on to tune the car when you actually corner weight it. I'm simply saying don't go hacking things off just to save a few pounds, you won't even save a second off your lap time if you cut off a hundred pounds. However you will shave SEVERAL seconds off if your car is balanced perfectly. Looking good so far though, cheers.
Yeah didn't word it quite right Albert, but you're right, the corner balance is far more important in the end, which will determine where a lot of things are installed, battery, fire system, exhaust etc.. to help balance the weight of my 200lb ass
POR 15 is basically a treatment method, i dont know the instructions by heart but you'll be painting the chemicals on through each step. basically one chemical preps the surface, the other is the actual por15 chemical that removes the rust.
found the instructions http://www.por15.com/Data%20Sheets/POR15ApplicationInfo.pdf
Listen great work everythings looking GREAT i cant wait to see how it turns out at the end....keep it up always feel free to ask me anything......and be prepared for a 10page essay of answers!
Great work Carl,
Once you finish with your welding, I recommend dressing the welds with seam sealer to prevent rust from ever forming. Then, use 2K epoxy primer and that seals everything up. I'm using PCL epoxy primer, which can be found at an auto paint supply store and Lord Fuzor seam sealer that comes in a caulking tube. Depending on how long your welds and raw metal are left unpainted, you might want to use etching primer as the first coat of paint, then seam seal and epoxy over it in that order. That's what I've done on my BMW 2002-here's alink to my project blog:
http://www.bmw2002faq.com/component/option,com_forum/Itemid,50/page,viewtopic/t,335842/
Keep up the great work!!
The model is equipped with attractive, efficient seats with a new sporty design as standard. With black upholstery and the addition of the Cupra logo on the backrest of the front seats, the interior of the Seat Ibiza Cupra looks even more sporty and